This topic contains 1 reply, has 1 voice, and was last updated by ![]() Miqobot 10 years, 3 months ago.
Miqobot 10 years, 3 months ago.
-
AuthorPosts
-
February 29, 2016 at 8:59 pm #225
What a Navigation Grid Is
Navigation grid is a simple way to tell Miqobot how to move through the area and to avoid obstacles. They consist of waypoints and connections between them. Without a grid, your character will just be standing there and staring at that lonely rock or tree.
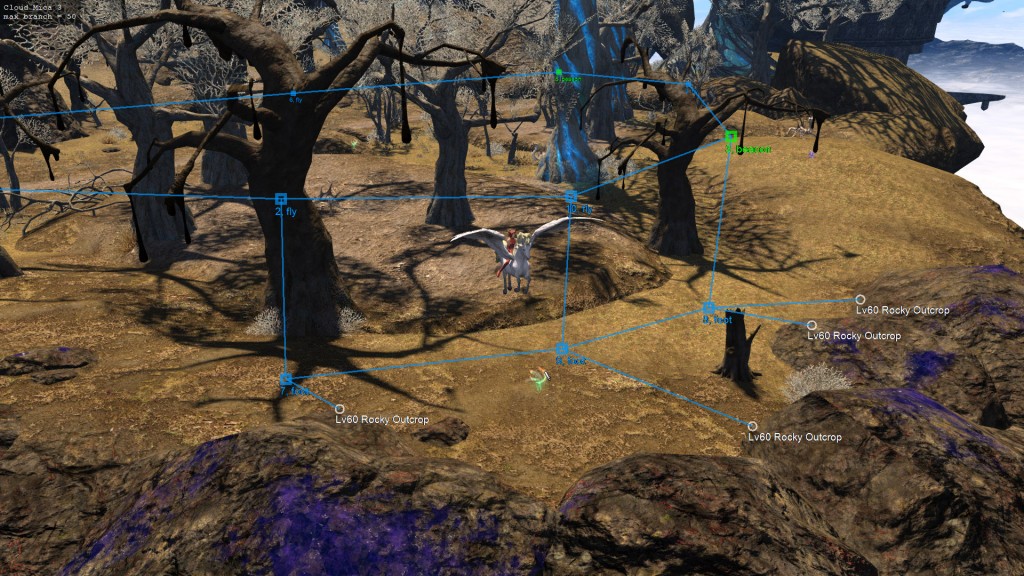
Here are a couple of examples what they look like.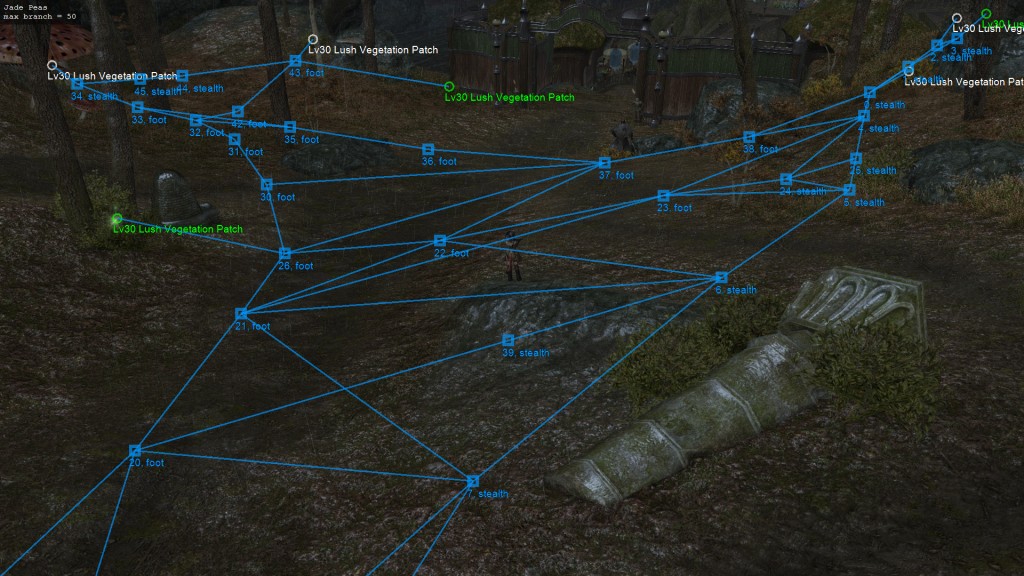
Navigation grids are used for Gathering and Treasure Hunt.
How 3D Editor Works
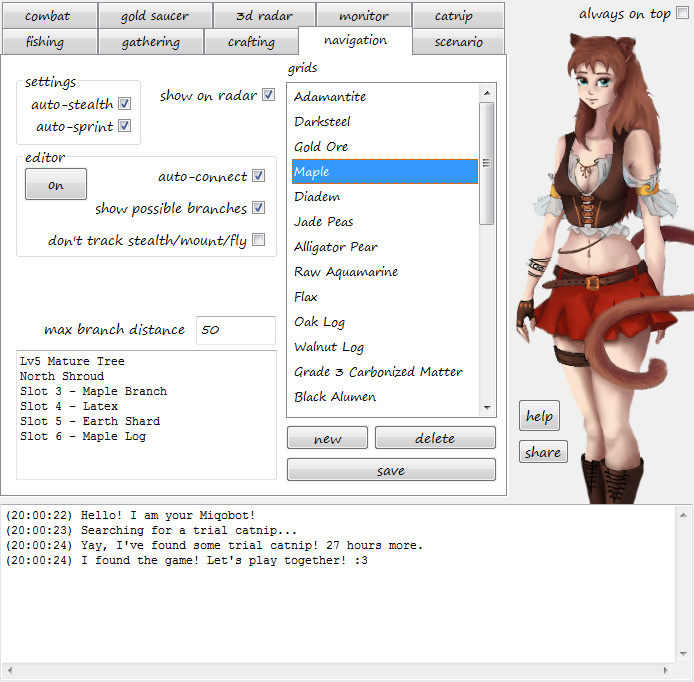
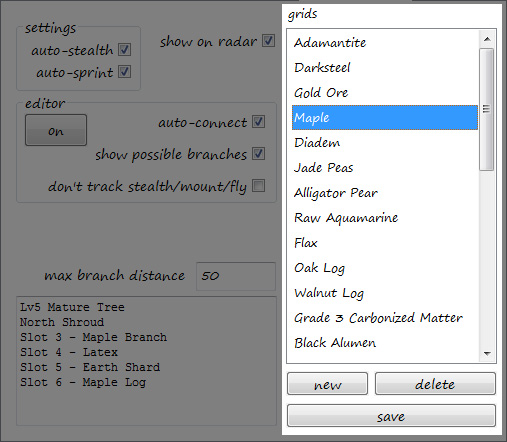
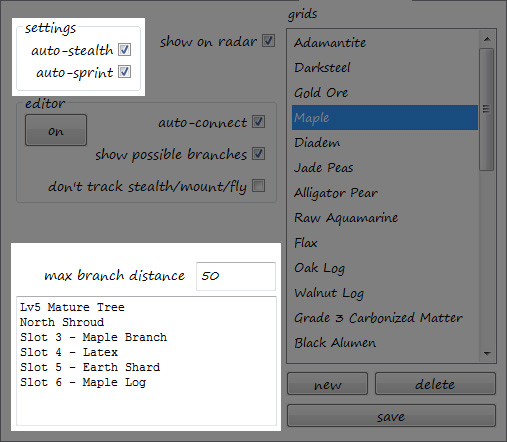
First of all, let’s take a closer look at one of the default grids in Miqobot.
- Teleport to New Gridania -> Yellow Serpent Gate (North Shroud).
- Select Maple from the list.
- Enable Show on Radar.
Switch back to the game. You should see a simple navigation grid designed for farming Lv5 Mature Trees in this area.
Next, let’s try creating a new navigation grid.
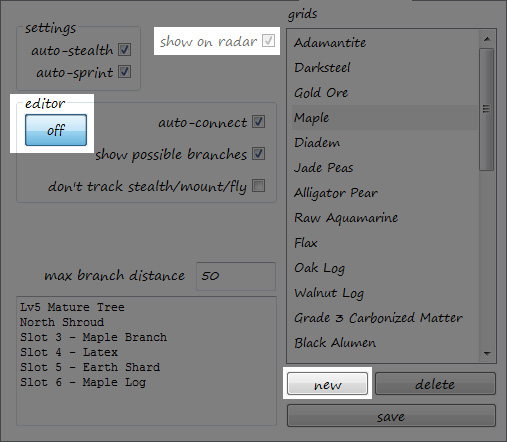
- Press New button under the list. You will see a blue square marked “0” under your feet.
- Double-click on “New Grid” and rename it to whatever you like.
- Press On button under Editor section. A green frame and instructions box will appear in the game.
- Make a few steps in any direction and press E. Another blue square marked “1” will appear.
- Keep going and pressing E until you have as many points as you want.
- Switch to Miqobot and turn Editor Off.
- Press Save button.
That’s it.
Now you have created your first navigation grid 🙂You can switch to 3D Radar tab and press Start under Treasure Hunt. This is the easiest way to test your navigation grid.
Points & Connections
Waypoints appear as enumerated blue squares on your screen. Depending on settings and your actions, their color may change.
 Blue square – common waypoint.
 Yellow square – highlighted waypoint (in 3D Editor).
In Green Mode it’s the waypoint that will be picked by Q. In Red Mode it’s the waypoint under mouse cursor. Orange square – selected waypoint (in 3D Editor).
In Green Mode it’s the waypoint you carry right now. In Red Mode it’s the waypoint selected by mouse click. Green square – beacon waypoint. It’s a special type of waypoint that is used in advanced Gathering setup.
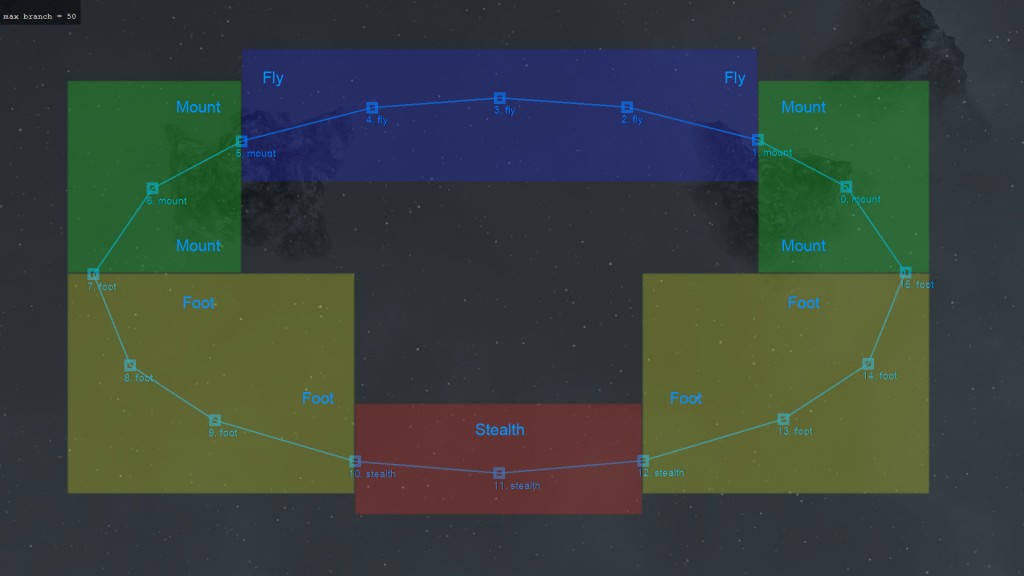
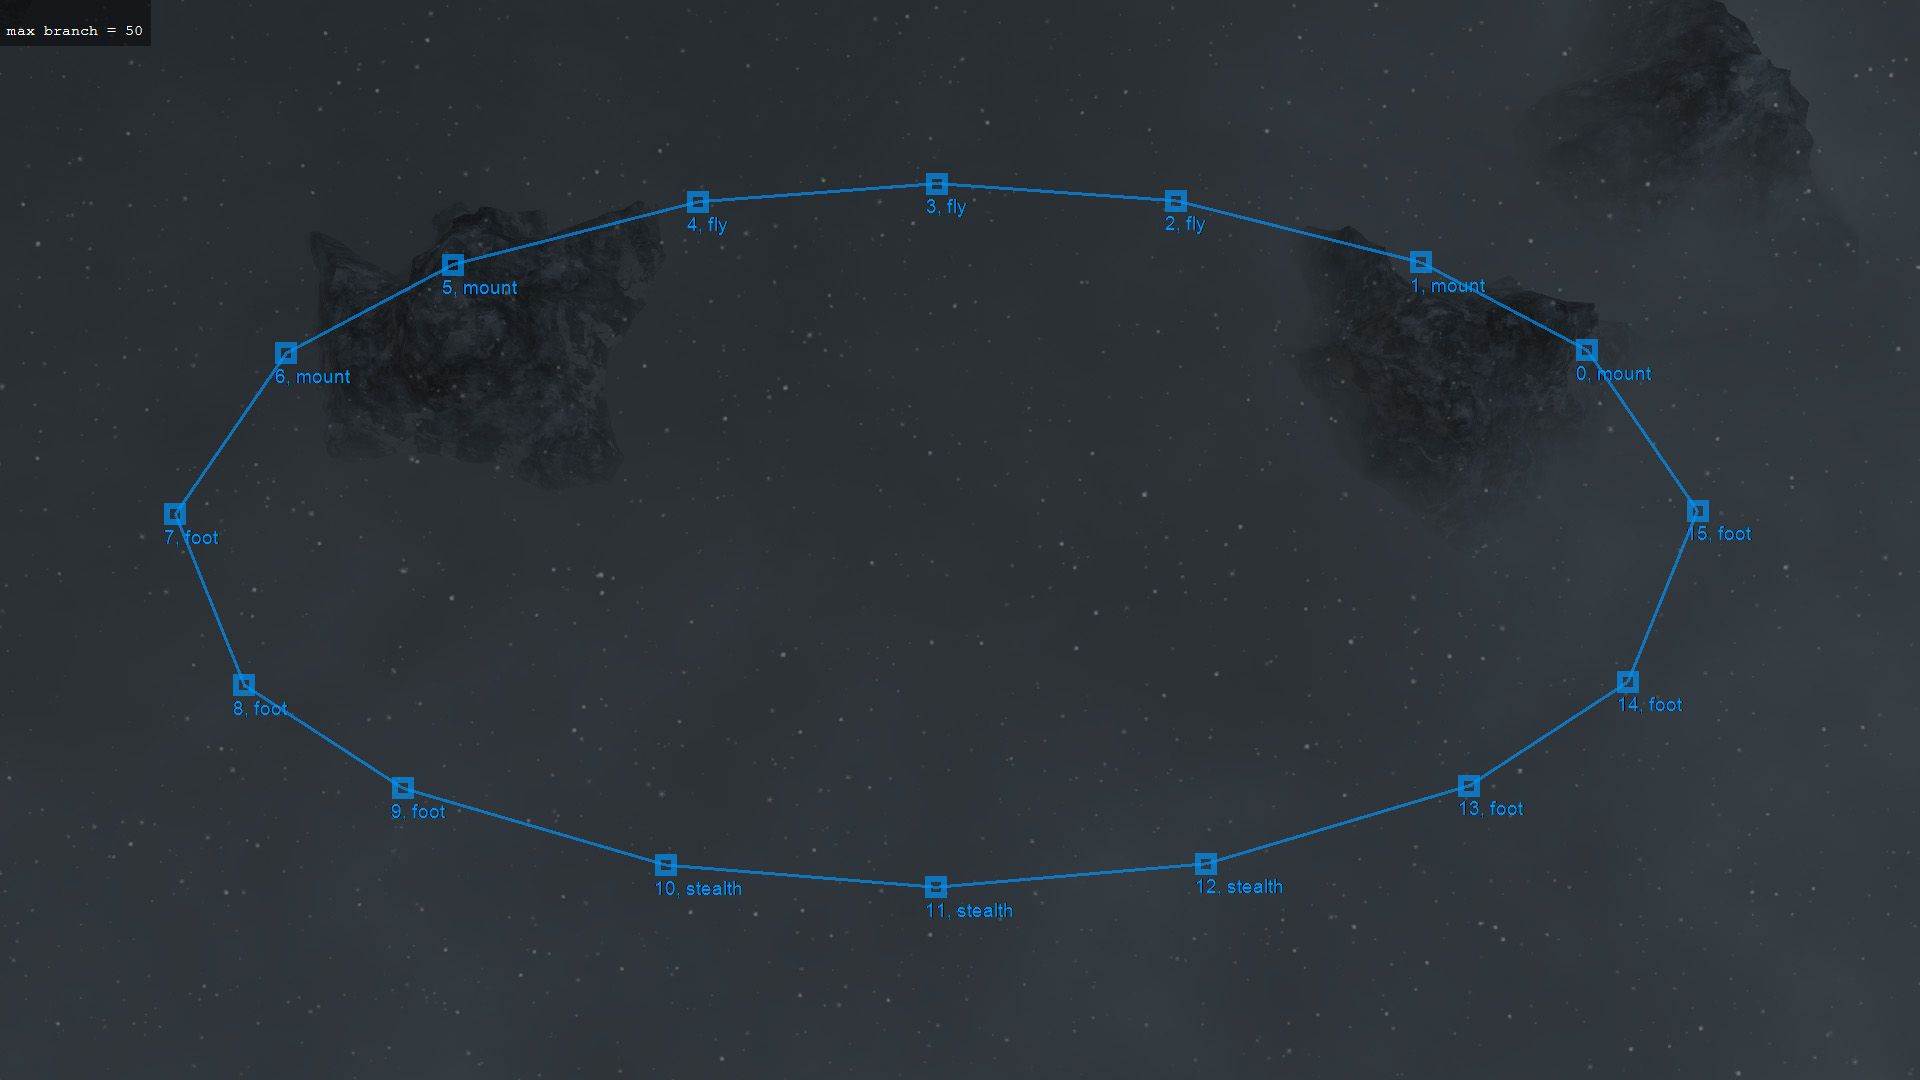
Each waypoint has a type. It’s written next to its number.
- foot – makes Miqobot walk on foot here. She will try to land and dismount.
- stealth – makes Miqobot try to hide here. Usually means a dangerous area.
- mount – indicates that Miqobot should use a mount here. Usually means a long distance route. Requires a mount icon on a hotbar.
- fly – indicates that Miqobot should fly here. Used in Heavensward and Stormblood locations, as well as for underwater swimming. Requires a flying mount icon on a hotbar.
- empty – indicates nothing specifically. Miqobot will travel through this waypoint in whatever state she was before (stealthed, mounted, or in flight).
- beacon – a special type for Gathering. Shows Miqobot a possible spawn area of gathering nodes. Other than that, works completely like empty type.
Transitional areas between types are solved based on priorities, which are implemented as follows:
fly > mount > foot > stealth
It means that when traversing from stealth to foot, Miqobot will disable stealth in the beginning of movement. And when traversing from foot to stealth, she will enable stealth in the end. Here’s a schematic illustration which will help you understand how priorities work. (The colored regions do not appear in the game, they just denote the priority areas on this illustration.)

Connections between waypoints are shown as lines.
 Blue line – common connection.
 Yellow line – highlighted connection (in 3D Editor). In Red Mode it’s the connection under mouse cursor.
 Orange line – ghost connection (in 3D Editor). In Red Mode it’s the connection drawn by mouse drag.
 Blue-Purple gradient line – unidirectional connection. Miqobot will move only from blue to purple.
You can think of them as arrows pointing in the purple end.
Tip: This is useful for creating shortcuts from high cliffs or walls. Miqobot will jump down, but she won’t try to climb back up. Make sure you also set up an alternative way back (in case you need it).
Grid List
This section povides a simple way to store your navigation grids and switch between them.
The list of actions:
- Click: Select a grid.
- Double-click: Rename a grid.
- New: Create a new grid.
- Delete: Remove a selected grid.
- Save: Save everything to file on disk (including any changes to other presets).
You can also share your navigation grids with other players. You can read more about it here: Import / Export.
Tip: You can easily clone your navigation grid by exporting and then importing the same file (because Export does not remove anything from your presets).When you launch Miqobot for the first time, she will create some default navigation grids for you. You are free to replace them with your own, this is just a basic set of examples to help you learn faster.
- “Adamantite” – For gathering Adamantite Ore in Azys Lla.
Tip: This grid is incomplete. You might want to finish it by connecting final waypoints back into the air. - “Darksteel” – For camping Darksteel near Camp Dragonhead.
- “Gold Ore” – For camping Gold Ore near The Burning Wall.
Tip: This grid starts at the base of aetheryte. So if you enable Use Truth, Miqobot will be able to navigate to Gold Ore spawn point on her own. - “Maple” – For gathering Maple logs near Gridania gates in North Shroud.
- “Diadem” – For searching Buried Chests in Diadem. You can read more here: Treasure Hunt.
- “Star Ruby/Sapphire” – Example of aerial navigation grid in Dravanian Forelands. Recommended to be used with gathering senses.
- “Cloud Mica” – Example of aerial navigation in Churning Mists. Recommended for experiments with beacons.
Instructions
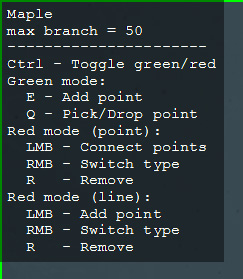
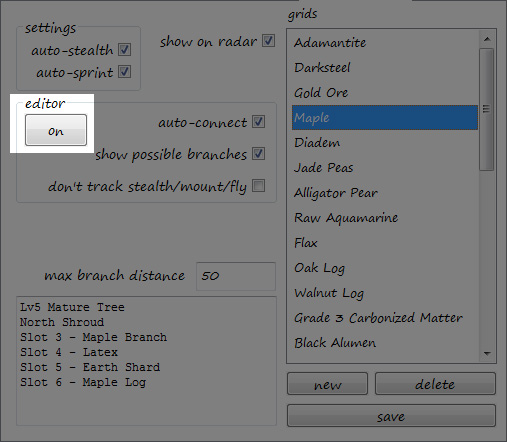
This button turns 3D Editor on and off. When it’s on, you will see a green/red frame around the game, which indicates the current mode of 3D Editor, and keyboard shortcuts will appear in the upper left corner.
- Press Ctrl to switch between Green and Red modes.
Tip: In Green mode, you may freely control your character. It is used for creating and moving waypoints.
Tip: In Red mode, 3D Editor turns into a transparent glass layer, which blocks you from controlling character. It is used to connect existing waypoints, to split connections, and to delete elements.
When in Green mode:
- Press E: Add a new waypoint.
- Press Q: Pick up the closest waypoint. Move it where you want and press Q to drop it again.
Tip: If you have any skills bound to E or Q, we recommend that you temporarily move them to a different hotbar, so they wouldn’t interfere.
When in Red mode (LMB = Left Mouse Button, RMB = Right Mouse Button):
- Hover over waypoint, Hold LMB: Draw a connection between two waypoints.
- Hover over waypoint, Click RMB: Switch waypoint’s type.
- Hover over waypoint, Press R: Delete it.
- Hover over line, Click LMB: Split it in half by adding an extra waypoint.
- Hover over line, Click RMB: Switch between unidirectional and bidirectional.
- Hover over line, Press R: Delete it.
Editor Settings

- Auto-Connect – makes 3D Editor automatically connect newly added waypoints. Switch it off, if you want to connect your waypoints manually later.
- Show Possible Branches – shows connections between grid points and gathering nodes. It helps you understand which gathering nodes are reachable and which are not.
Tip: You can adjust the length of branches with Max Branch Distance. - Don’t Track Stealth/Mount/Fly – disable detection of your character’s state. Newly added waypoints will have no type assigned to them.
Navigation Settings
The first two are global options that control Miqobot’s behaviour independently of the selected navigation grid.
- Auto-Stealth – makes Miqobot detect aggro monsters and hide when they are too close. When they move away she will unstealth. Monsters level is considered as well – no weird hiding from tiny spiders 50 levels below you. Note: It doesn’t work with mount, fly, or manual stealth waypoints.
Tip: In some rare cases, auto-stealth may not work correctly. Typical reasons are high latency, connection lag, weird landscape, or a combination of them. If you encounter this, we recommend to switch to manual stealth waypoints. - Auto-Sprint – makes Miqobot use sprint whenever possible. She will also use sprint during stealth, so if you consider this a weird behaviour – feel free to turn it off.
If you want more precise control over Auto-Stealth function, there are a couple of advanced options. They are not present on UI, but you can adjust them directly in settings.miqo.
Tip: Close Miqobot Before editing settings.miqo, because otherwise she will overwrite your changes with whatever was stored in the memory.- advanced.stealthin – sets the minimum distance to aggro monster, which is considered safe. An inch closer, and Miqobot will activate stealth.
- advanced.stealthout – sets the maximum distance to aggro monster, which is considered unsafe. Beyond this point, Miqobot will deactivate stealth.
If you feel like Auto-Stealth almost works for you, but still not enough – try adjusting these settings.
The last two are properties of a navigation grid.
- Max Branch Distance – sets the distance at which gathering nodes are considered reachable by Miqobot.
In other words, Miqobot will never move away further than this from the grid. - Description – sets a reminder for you (and players you will share with) what this grid is designed for.
We recommend putting job, level, item’s name, and location here. But it’s completely up to you how to use it.
An imporant note!
Do Not start Miqobot without a direct view of the grid’s closest waypoint. If you do, you might make your character run into a wall and get stuck.Miqobot also has an integrated kill-switch which is triggered when she’s not able to perform a specific mini-task within the allotted time. Running into a wall will definitely trigger it if you’re not careful enough. This is done to prevent your character from doing anything weird when you’re AFK and Miqobot gets stuck for any reason.
When this happens, Miqobot will say something like this:Sorry, can't move. I got lost in the woods, and I can't find way back home.
The only way to reset this kill-switch is to restart Miqobot completely.
Legacy Movement Type
For navigation Miqobot uses Legacy Movement Type. It makes you look more like a player and less like a spinning bot.
Eventually, we are going to suppport both Movement Types, so you won’t have to switch between them just for Miqobot. For now, please go to System -> Character Configuration -> General to switch Movement Settings to Legacy Type.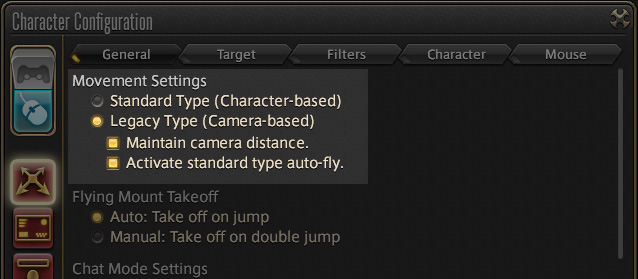
Video
Here you may see how Miqobot behaves under different conditions. Transitions between different types of waypoints are shown.
You may also notice that avoiding aggro enemies works different in flight and on ground. During flight Miqobot will fly up to lose hate, while on ground she will try to avoid monsters with stealth.Attachments:
You must be logged in to view attached files.April 21, 2016 at 9:13 pm #1018 -
AuthorPosts


The forum ‘Help’ is closed to new topics and replies.